Sensors can now be added to previously created Zones.
•Before adding Sensors you will need to select the Zone that you wish to add Sensors to.
To Add Sensors to a Zone:
1.Select View Data > Edit Mode.
•A window similar to the one shown below is displayed:
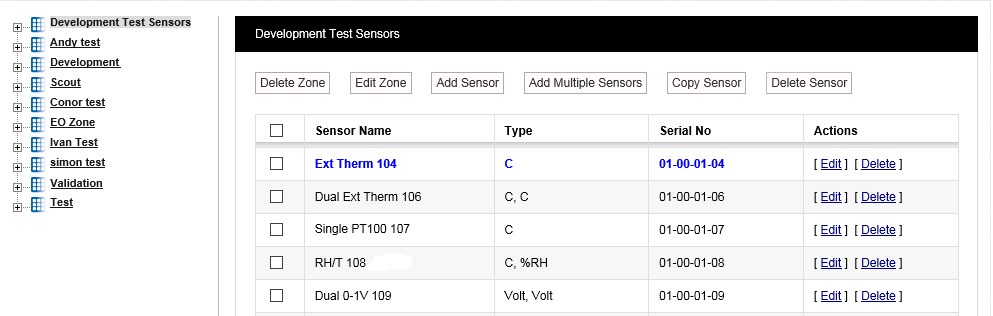
2.From the left hand list, select the Zone you wish to add a Sensor to.
•You will notice that the Zone Development Test Sensors is highlighted and Sensors already associated with this Zone are shown in the window's table.
•By default, the Zone at the top of the list is the Zone that the new Sensor will be added to.
•If you wish to add a Sensor to another Zone, simply click on the Zone's name in the left hand list.
3.Click on the Add Sensor button.
•The Add Sensor window is displayed, see below:
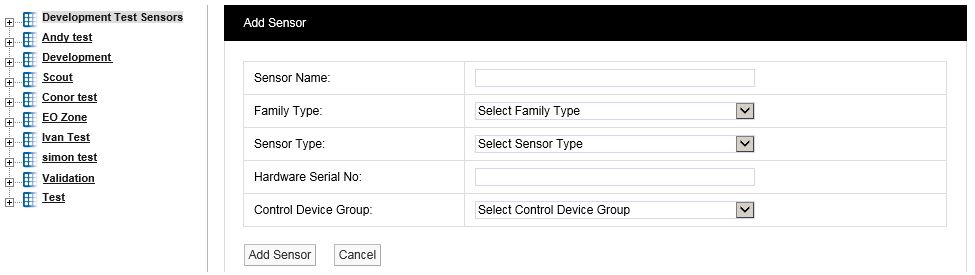
4.Enter the Sensor's details into the window:
Sensor Name:
Here you can type a name for the Sensor that means something in relation to either the type of measurement that the Sensor is making or the location, for example, Room 1 RH/T.
Family Type:
The ‘family’ for the sensor you are adding. Select from iSense, Notion or Legacy / Scout.
Sensor Type:
Select the type of Sensor you are adding from the drop-down menu, a detailed list explaining all the Sensor types can be found on the Ellab Monitoring Solutions Ltd Group website.
For this example we will add a temperature sensor, the standard temperature and humidity sensor can be found in the list as Notion Temperature/RH.
Hardware Serial No:
This is the transmitter serial number and can be found on the back of the transmitter, for example: 50-00-02-08.
Note: if the Sensor has already been added, you would get an error message, as shown in below:
![]()
Control Device Group:
The Control Device Group contains wireless receiving device that will receive the data from the transmitters. The Control Device Group is selected from the drop down menu, select the Group that corresponds to the Site and is compatible with the wireless transmitters used at that Site. For more details see Device Configuration. For this example, we are going to select Notion Pro Group.
5.Once you are happy with the details, select Add Sensor.
•You will now see that the Zone icon has a + symbol to the left of the icon and that the sensor we have just created has appeared in the table on the right hand side of the screen. See below.

You can add more sensors by repeating the steps above. Multiple sensors of same sensor type can also be added by selecting Add Multiple Sensors, this feature is useful for adding sensors in a batch. When adding more sensors additional Zones can also be added and additional sensors added to those Zones. Sensors can be edited or deleted by selecting either Edit or Delete in the line corresponding to the sensor to be edited or deleted.
To Copy Sensors from One Zone to Another
There are cases where you may want to have the same sensor duplicated in different Zones. In this case, Sensors can be copied from on Zone to another.
Example 1
When a site has an outdoor sensor it is desirable to have this sensor available in every Zone. The data from an outdoor sensor can be compared with sensor data from individual rooms to see if the conditions inside are being driven by the conditions outside. This is a good indicator of how well HVAC systems (Heating, Ventilating and Air Conditioning) are performing.
Example 2
Rooms that have many enclosed spaces such as fridges in a hospital or display cases in a museum can benefit from being able to compare sensor data. A gallery with 20 display cases all with RH/T sensors could be compared with an RH/T sensor placed in the open gallery. By comparing the data you can see if the conditions outside are driving the conditions inside the cases.
To copy sensors, highlight in the Zones list the Zone that you want to copy sensors to then select Copy Sensor from the Zone dialog box. The Copy Sensors to window appears, see below. You will notice that the name of the Zone that the sensors are going to be copied to forms part of the window name.

To copy sensors:
1.Select the Zone that you want to copy the sensor/s from.
•The names of the available sensors in that Zone will appear in the left column.
2.Highlight the sensor/s you wish to copy then click ![]() .
.
•This will move the highlighted sensor/s to the column on the right.
•To copy all the sensors click ![]() .
.
3.When you are happy with the details, select Submit.
To Delete Sensors
There are three methods to delete Sensors:
•Select the tick box to the left of the sensor names that you want to delete on the Zone dialog box, then select Delete Sensor from the top menu.
•This will delete all highlighted sensors.
•Select Delete in the row corresponding to the sensor you wish to delete.
•This will delete only that sensor.
•To delete all sensors in the table, select the tick box on the left of the title row (next to Sensor Name), then click Delete Sensor.
Warning: Deleting Sensors cannot be undone.