| Warning: | Changing settings in this section will impact on system function, please proceed with caution. If in doubt please contact your local supplier or Ellab Monitoring Solutions Ltd Support. |
This section is where Notion Pro Hardware Devices are setup and configured.
|
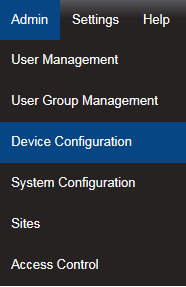
Select Admin>Device Configuration from the drop down menu to access the Device Configuration section. After selecting Device Configuration a new window appears (see below).
|
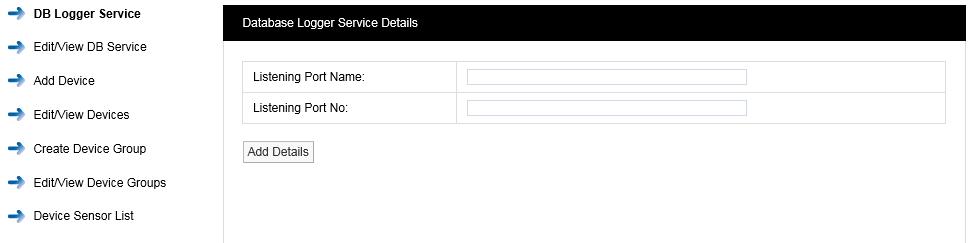
Setting up the Database Logger Service
The DB Logger Service is the Service that passes data to the SQL database. The Listening Port Name and the Listening Port No are set automatically during installation. There is an option to change this information during installation but it is highly recommended that the default values are used. If there is a port conflict this should be noted on the Notion Pro Pre-Requisites Manual (doc. no. IM5546).
Edit/View DB Service
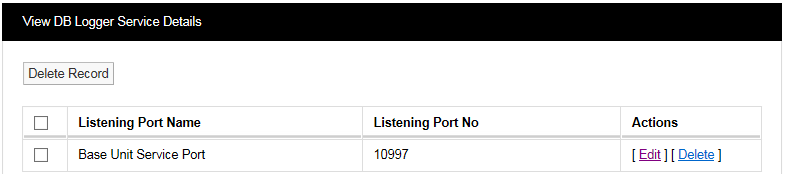
To Edit the Listening Port No select Edit/View DB Service from the menu. A new window View DB Logger Service Details will appear, see below.
It is possible at some time in the future that a new piece of software could be added to the server which causes a Port conflict. Ellab Monitoring Solutions Ltd would recommend that the new item be given a different Port number. If this is not possible then a new Port number can be allocated to the relevant Notion Pro Service.
To Edit the Port number select Edit in the line corresponding to the Service you wish to change the Port number a new window Database Logger Service Details will appear, see below.
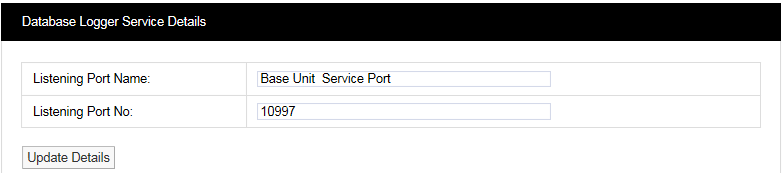
You will need to contact your IT department or IT service provider to get a new Port number. Once you have the new Port number enter it into the dialog box next to Listening Port No. Once you are happy with the details select Update Details.
Warning: The Data Services will need to be re-started after changes are made, and all Receiver Units , Alarm Units and SMS Units will need to be reconfigured.
This section describes the addition of wireless receiving devices to Notion Pro. To add Devices to Notion Pro select Add Device from the side menu. A new window Control Device Details will appear, see below.
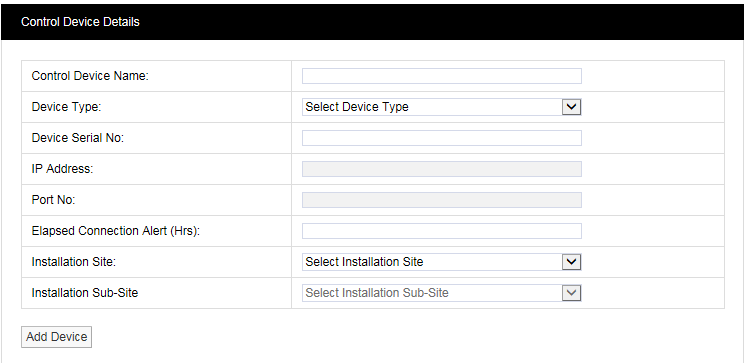
Control Device Name:
This should to be related to Site and location to identify the Device this should be a unique name across all sites. Example: Network Receiver First Floor Building One. Enter required text into dialog box next to Control Device Name.
Device Type:
The Device Type is selected from a pre-defined list. Select the Device Type from the drop-down menu. There is a label on the back of all Receiving Devices that states the Device Type.
Device Serial No:
This can be found on a label on the back of the device.
Elapsed Connection Alert
An Alert is generated if the specified time period elapses, without the selected device connecting to the Hanwell Remote Data service. An entry is recorded in the Activity Log and the icon in the Available Sites dialogue box (see Site Management) changes to red (![]() ). If the Email System Group and/or the SMS System Group has Hardware Event selected, then an Email and/or SMS will be sent.
). If the Email System Group and/or the SMS System Group has Hardware Event selected, then an Email and/or SMS will be sent.
Installation Site:
The Installation Site can be selected from the drop-down menu. This list is automatically populated with Site names added in the Sites section. Select the Site name for the Site that you are adding the Device to.
Installation Sub-Site:
The Installation Sub-Site can be selected from the drop down menu. This list is automatically populated with Sub Site names added in the Sites section. Select the Sub Site name for the Site to which you are adding the Device.
Edit/View Devices
Select the items to Edit when happy with the changes select Update Details.
Create Device Groups
Base Units can receive data from a maximum of 200 transmitters. On systems with more than 200 transmitters, Device Groups enable specific sensors to be assigned to a Base Unit, or group of Base Units.
On systems with fewer than 200 transmitters, all sensors are available to be received by all Base units. However, Base Units still need to be a member of a Device Group.
If you are going to fewer than 200 transmitters and all your Base Units are in a single location such as a warehouse or a laboratory, then it is probably best to group all your Base Units in a single group.
If you are going to exceed 200 transmitters then you will need to use multiple Device Groups; also if you have Base Units at separate physical locations, then using separate Device Groups can help you manage your system.
To add a Device Group select Create Device Groups from the menu, a new window Create Device Group will appear, see below.
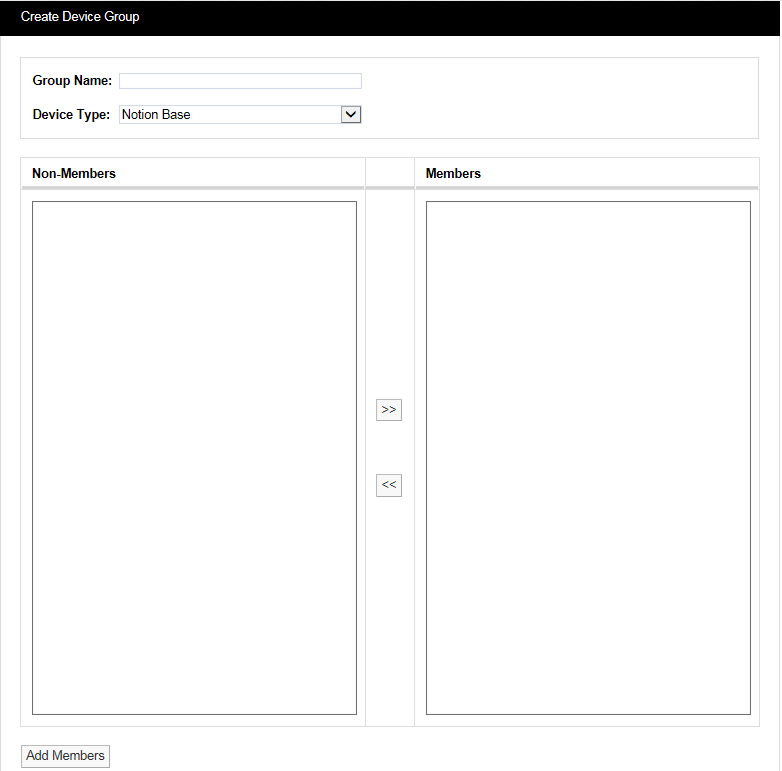
The Group Name should be a name that easily identifies a Device Group, a Group that contains one or more Receiving Devices. Every receiving device must be in a Device Group.
The Device Type is selected from a drop down menu. Select the Device Type that corresponds to your Device. The name of the device type is clearly printed on the front of your device (Base Unit).
Available Devices will be listed in the left column, to select a Device highlight it then click the double right arrows to move it across to the right column.
Once you are happy that the details are correct select Add Members.
Edit/View Device Groups
To Edit/View Device Groups select Edit/View Device Groups from the menu to give the View Device Groups window, see below.
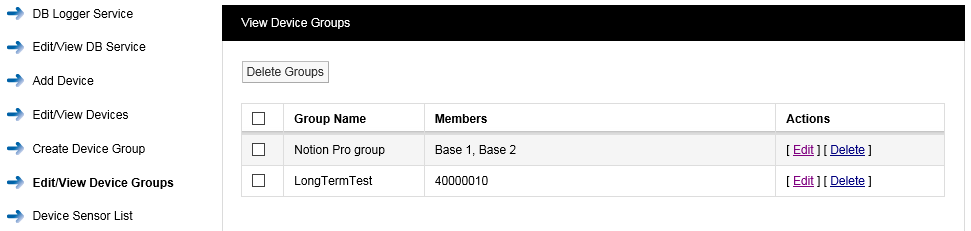
To Edit a Device Group select Edit in the line corresponding to the Group Name that you wish to Edit, a new window called Edit Device Group will appear, see below.
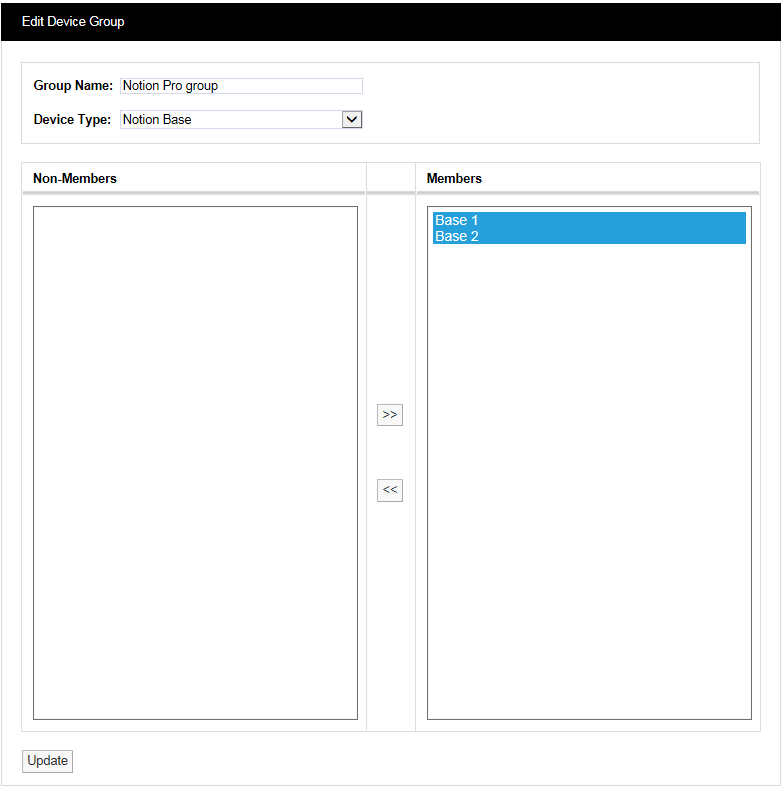
To remove Devices from the Group highlight them in the right hand column then select ![]() . This will deselect them and move them to the left column. You cannot de-select all Devices from a Group a Group always has to have at least one Device. If you need to deselect all the Devices then Delete the Group. This can be done by selecting Delete in the previous step.
. This will deselect them and move them to the left column. You cannot de-select all Devices from a Group a Group always has to have at least one Device. If you need to deselect all the Devices then Delete the Group. This can be done by selecting Delete in the previous step.
Note: For systems with less than 200 sensors, Device Sensor Lists have no effect.
These list all the sensors associated with a Device Group. The signal from a given sensor can be received by more than one Base Unit (Network Receiver). You can select a particular sensor instance (for example, the one with the highest signal strength) and assign it to the associated device group.
To display a Control Device Sensor List select Device Sensor List from the menu on the left to give the Control Device Sensor List window, see below.
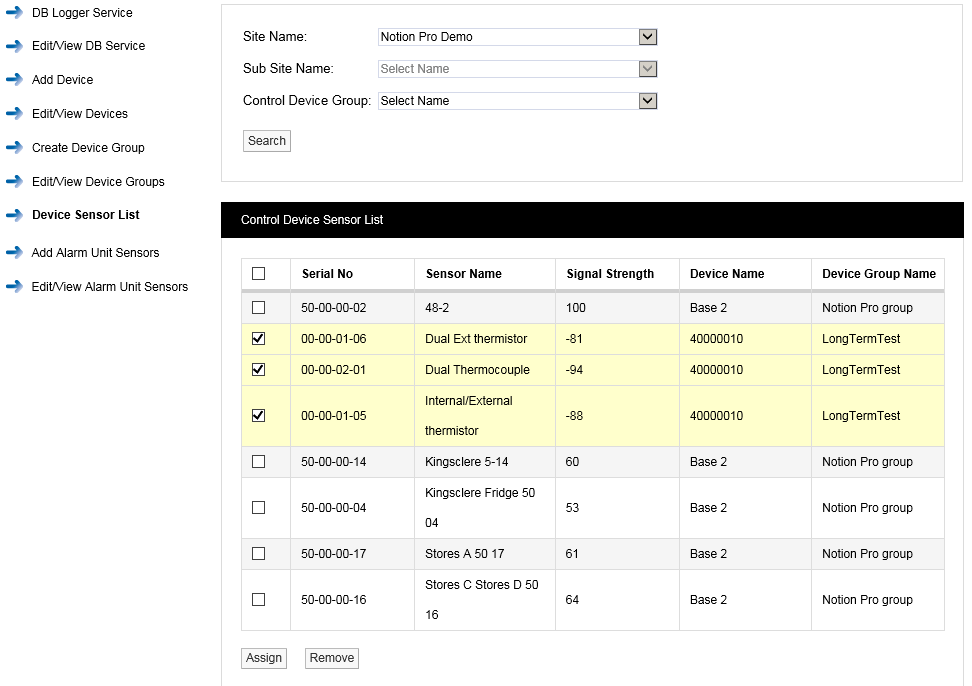
| Note: | You cannot create (or delete or edit) a Control Device Sensor List. These are created by Notion Pro as sensors are added to the System. |
Select the Site of interest from the ‘Site Name’ list. You must select a Site. Select the Sub Site of interest from the ‘Sub Site Name’ list, and the Control Device Group of interest from the ‘Control Device Group’ list. It is not necessary to specify a Sub Site or a Control Device Group, in this case a list of sensors for all Sub Sites and Device Groups will be generated (as in the example above). Click Search to generate the list.
To assign a sensor to its associated Device Group, select the tick box on the left side of the table, then click Assign. The list will be redisplayed with assigned sensors highlighted. (See above, three sensors have already been assigned to the ‘LongTermTest’ Device Group).
To remove a sensor from its associated Device Group, select the tick box on the left side of the table for the sensors you wish to remove, then click Remove. The list will be redisplayed with assigned sensors highlighted. (In the example above, three sensors have already been assigned to the ‘LongTermTest’ Device Group).
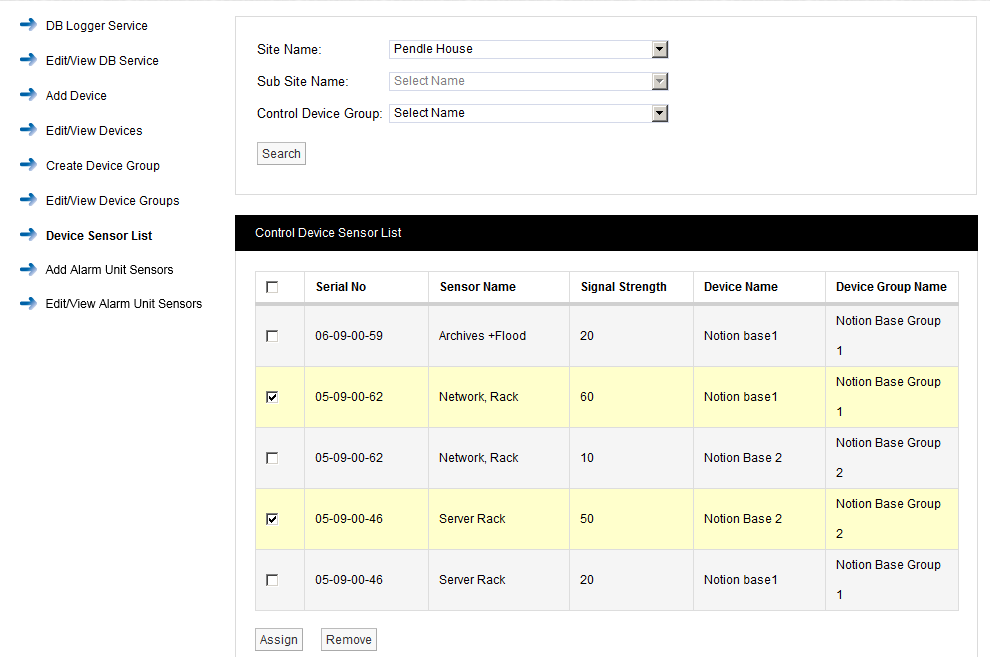
As another example, the example below shows a case where signals from two sensors (05-09-00-62 and 05-09-00-46) are each being received by two Network Receivers. The user has selected the two sensors with the highest signal strengths to link to a Device Group.
This facility supports the operation of the Notion Alarm Unit (the ARB Module) and enables you to associate sensors with the unit. Select Add Alarm Unit Sensors from the side menu, see below.
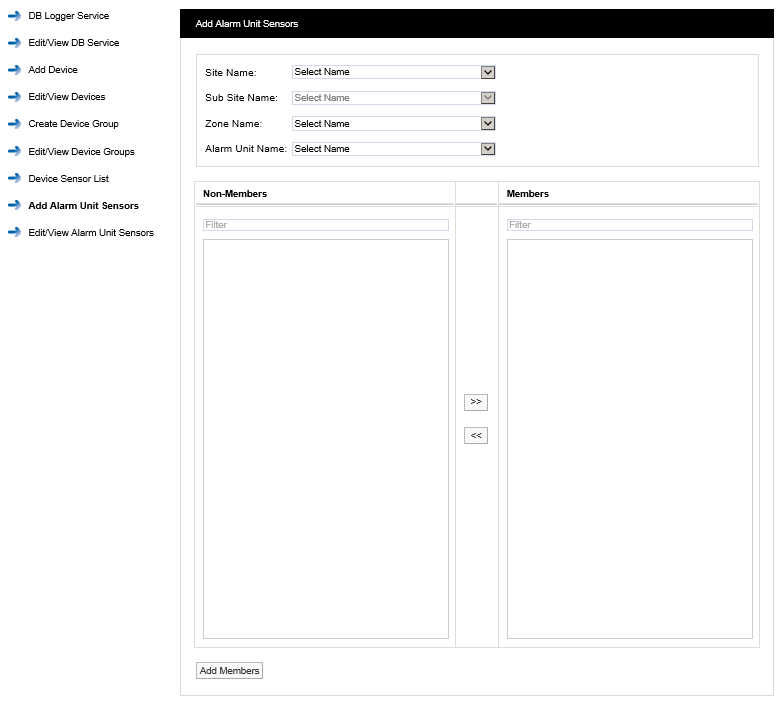
Site Name
Select the Site which contains the Alarm Unit of interest from the pull-down list.
Sub Site Name
Select the Sub Site (if present) which contains the Alarm Unit of interest from the pull-down list.
Zone Name
Select the Zone which contains the Alarm Unit of interest from the pull-down list.
Alarm Unit Name
Select the Alarm Unit of interest (previously created using the Add Device facility described at section 2.7.3). The Add Alarm Unit Sensors dialog box changes to show a list of the sensors which can be associated with the Alarm Unit. See below for example.
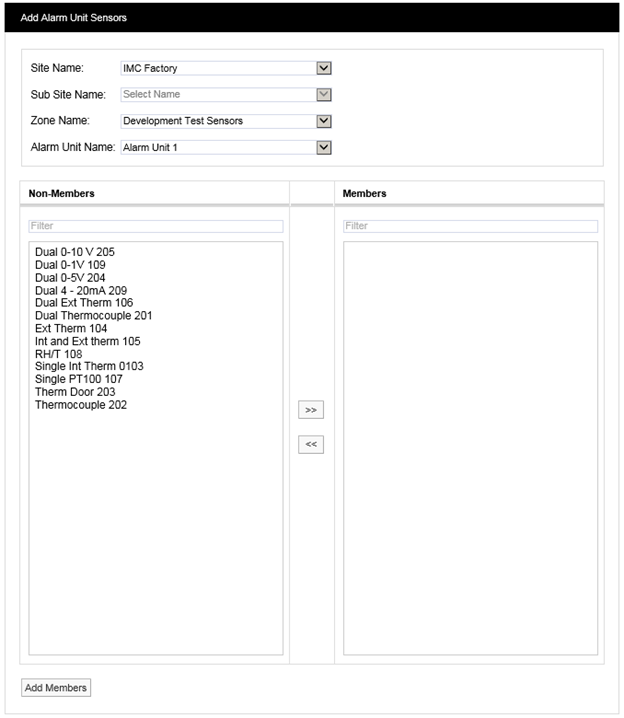
To associate sensors with the Alarm Unit select the required sensors from the Non-Members list then select ![]() to move the selected sensors to the Members list. Click Add Members to move the selected sensors to the Members list. The View Alarm Unit Sensors dialogue box will appear to show the sensors which have been associated with the Alarm Unit. See below for example.
to move the selected sensors to the Members list. Click Add Members to move the selected sensors to the Members list. The View Alarm Unit Sensors dialogue box will appear to show the sensors which have been associated with the Alarm Unit. See below for example.
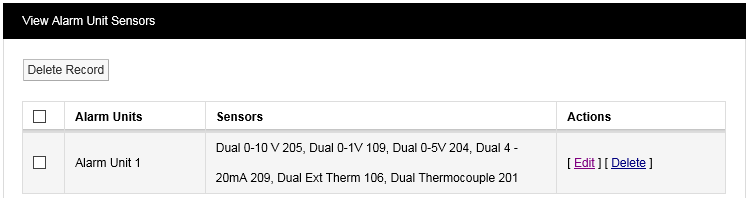
Editing/Viewing Alarm Unit Sensors
To edit or view associated Alarm Unit sensors select Edit/View Alarm Unit Sensors from the menu to give the View Alarm Unit Sensors window, see above for example.
To the list of sensors associated with a given Alarm Unit, select Edit in the line corresponding to the Sensor list that you wish to Edit. A new window called Edit Alarm Unit Sensors will appear, see below.
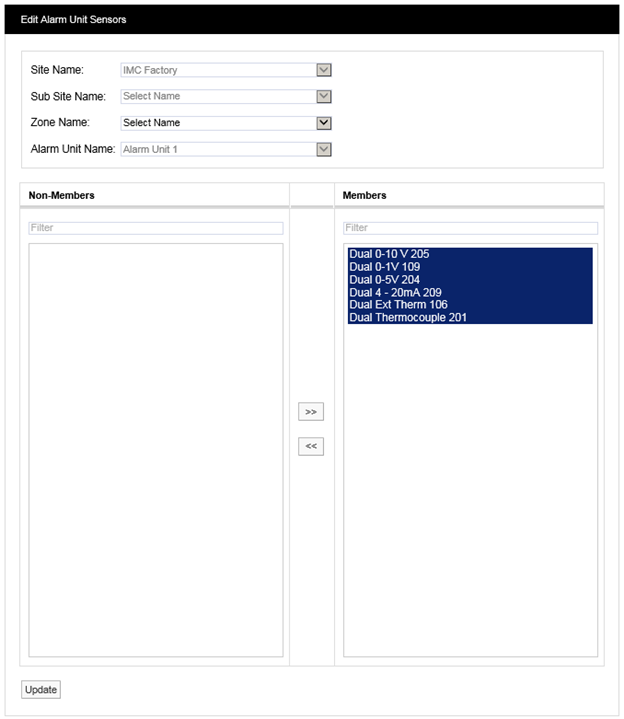
To remove sensors from the list highlight them in the left hand column then select ![]() . The double left arrows will de-select the selected sensor(s) and move them to the left column. Having de-selected the required sensors click Update to update the list.
. The double left arrows will de-select the selected sensor(s) and move them to the left column. Having de-selected the required sensors click Update to update the list.