Sites are the main access points to the system data, each Site represents a single physical Site where receiving devices such as Network Receivers are sited along with measuring Sensors/Transmitters.
Sites can also have Sub Sites associated with the main top level Site. A Sub Site is used where it is desirable to sub-divide a main Site, for example when there are large numbers of sensors on a Site or many departments. Sub Sites could also be floors in a building or departments.

When Sub Sites are used the View Data, User Alerts, Reports and Logs are not available from the top level Site. These functions are now available from the Sub Sites. See below for details of viewing Site data from the Available Sites dialogue box.
Creating Sites
|
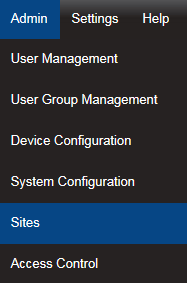
Select Admin>Sites from the drop down menu to access the Sites section. After selecting Sites a new window appears (see below).
|

To add a Site complete the following:
•Site Name: Enter a name for the Site. For example, this could be the name of the company.
•Location: Enter the location. For example, this could be the town or city. (not mandatory)
•Address: This would be the Site address. (not mandatory)
•Post Code: This would be the Site post code. (not mandatory)
•Time Zone: Set this to the time zone of the Site. (The value displayed by default is the time zone of the host PC. It is important to set this correctly, as dates in the database are stored using GMT.)
•When all details have been entered and are correct, click Add Site.
Viewing Sites
To View Sites select Edit/View Sites from the side menu. The Available Sites window appears. See below.
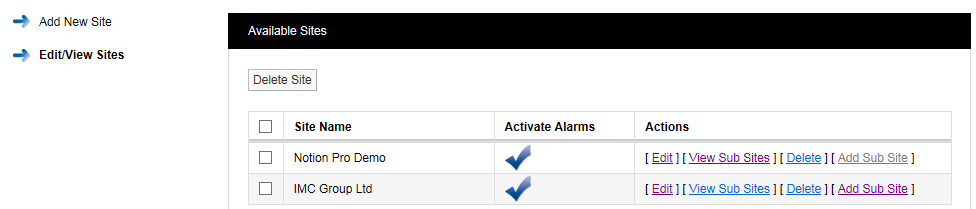
| Note: | The Available Sites dialogue box here is for editing Sites and Sub Sites and is not same as the Available Sites dialogue box available from the System Overview selection. |
Editing Sites
To edit a Site select Edit on the line corresponding to the Site you wish to edit. The Edit Site window appears, see below.
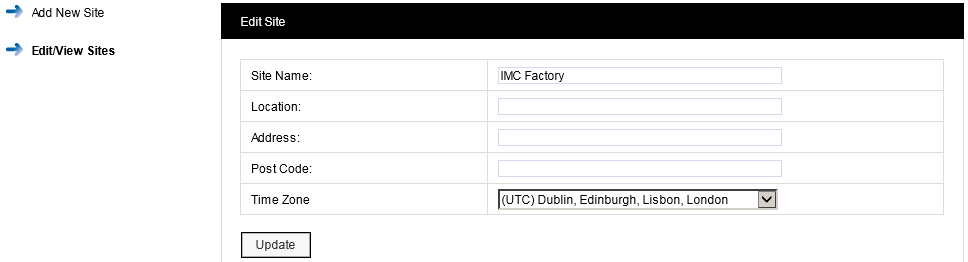
All Site details can be edited in this window. When all details are correct select Update to save details.
Adding Sub Sites
To add Sub Sites select Add Sub Site on the line corresponding to the Site you wish to add Sub Sites to. The Add Sub Site window appears, see below.

Enter a name for the Sub Site into the Sub Site Name field. When all details are correct select Add Sub Site to save the details and add the Sub Site.
To return to the main Sites menu select Edit/View Sites from the side menu.
Deleting Sites
To delete a Site you must first delete all Sub Sites if any exist. To check this select Edit/View Sub Sites. If Sub Sites exist select Delete to delete the Sub Site, see below.

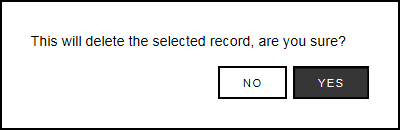
When you are happy that you are deleting the correct Sub Site click Delete and confirm the deletion, see below.

After deleting all Sub Sites the main site can now be deleted, to delete the required Site select Delete against the Site to be deleted.
When you are happy that you are deleting the correct Site select YES, see below.

Viewing Sub Sites
To View a Sub Site select View Sub Sites on the line corresponding to the Site you wish to view Sub Sites for. The Available Sub Sites of window appears, see below.

To Edit the Sub Site select Edit, address details and images can be changed or added. When happy with any changes select Update.
Adding Company Details
Select Company Details from the menu allows you to add your Company logo. After adding the details the logo will appear next to Notion Pro logo in the header of the website.
To add your logo, click Choose File navigate to the required logo image, and click Open. Choose File button varies from browser to browser; in some browsers it might say Browse.
